Globus Toolkit 安装与配置
1. 安装前准备工作
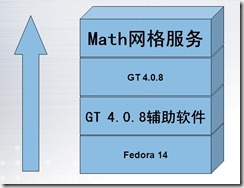
准备工作包括软件的准备和环境变量的设置。操作系统选用ubuntu 11.10,Globus Toolkit的安装包为:gt4.0.8-all-source-installer.tar.gz(或者使用适用于ubuntu的gt4.0.8-x86_deb_3.1-installer.tar.gz)下载地址:http://globus.org/toolkit/downloads/,此外还需安装JDK、ANT 下载地址: http://ant.apache.org/bindownload.cgi、JUNIT最新版本。 图1表示了各软件之间的层级关系。
图1 各软件层级关系
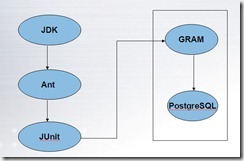
图2为GT4的安装流程图。

图2 GT 安装流程图
辅助软件安装完成之后,需要设置系统环境变量。具体方法是修改系统变量配置文件 /etc/profile。
参考:
# /etc/profile: system-wide .profile file for the Bourne bash (sh(1))
# and Bourne compatible bashs (bash(1), ksh(1), ash(1), ...).

if [ -d /etc/profile.d ]; then
for i in /etc/profile.d/*.sh; do
if [ -r $i ]; then
. $i
fi
done
unset i
#Add
unset pathmunge
export ANT_HOME=/usr/local/apache-ant-1.8.2
export JAVA_HOME=/usr/lib/jvm/java-6-openjdk
export GLOBUS_LOCATION=/usr/local/globus
export GPT_LOCATION=/usr/local/globus
export CLASSPATH="./:JAVA_HOME/lib:JAVA_HOME/jre/lib"
export PATH=$PATH:$JAVA_HOME/bin:JAVA_HOME/jre/bin:$GLOBUS_LOCATION/bin:$GLOBUS_LOCATION/sbin:$ANT_HOME/bin:/bin:/usr/bin:/usr/sbin
export LD_LIBRARY_PATH=$/usr/local/globus/lib

fi

if [ "$PS1" ]; then
if [ "$BASH" ]; then
PS1='\u@\h:\w\$ '
if [ -f /etc/bash.bashrc ]; then
. /etc/bash.bashrc
fi
else
if [ "`id -u`" -eq 0 ]; then
PS1='# '
else
PS1='$ '
fi
fi
fi
umask 022
关于安装需要注意以下几个问题:
1 .要确认已安装C编译器gcc,及g++,否则GT4.0.8将无法 进行编译;关于用户需要注意以下几个问题:2.确认GUN TAR在安装目录中.否则将无法进行解压缩.
3.注意设置自己的主机名,如果使用默认主机名Localhost则在进行服务器认证请求时会失败.
除了设置一个globus用户外,还应设置几个普通用户,并且要注意普通用户的权限设置,应能访问globus的安装目录.如我就设置了4个普通用户,如feetoo,postgre,user01, user02。在进行用户认证时,常会因为用户权限问题失败,且此用户名不能重新认证,所以应多设几个普通用户。
必要用户:root,globus,普通用户(建议多个)
2.基本环境的配置(主节点和子节点一样)
2.1 Install JDK
首先把JDK安装文件拷贝到/usr/local下面
[root@xx1 win]# cp jdk-6u1-linux-i586.bin /usr/local/
然后,我们查看权限
[root@xx1 local]# ls -la jdk-6u1-linux-i586.bin
-rwxr-xr-x 1 root root 62772481 07-04 21:13 jdk-6u1-linux-i586.bin
root用户已经有执行权限,我们直接执行文件
[root@xx1 local]# ./jdk-6u1-linux-i586.bin
JDK解压完毕 ,我们查看一下,并建立符号链接
[root@xx1 local]# ln -s jdk1.6.0_01 jdk
我们查看链接是否正确
[root@xx1 local]# ls -la jdk
lrwxrwxrwx 1 root root 11 07-04 21:18 jdk -> jdk1.6.0_01
2.2 Install ANT
- ANT安装到/usr/local/文件夹下,并建立符号链接
- 编辑/etc/profile文件,导出变量
[root@xx1 local]# vi /etc/profile
#编辑后,用tail命令查看
[root@xx1 local]# tail /etc/profile
doneunset i
unset pathmungeexport ANT_HOME=/usr/local/ant
export JAVA_HOME=/usr/local/jdk
export GLOBUS_LOCATION=/usr/local/globus
export GPT_LOCATION=/usr/local/globus
export CLASSPATH="./:JAVA_HOME/lib:JAVA_HOME/jre/lib"
export PATH=$JAVA_HOME/bin:JAVA_HOME/jre/bin: $GLOBUS_LOCATION/bin:$GLOBUS_LOCATION/sbin: $ANT_HOME/bin:$PATH
export LD_LIBRARY_PATH=$/usr/local/globus /lib
使变量生效
[root@xx1 local]# source /etc/profile
2.3    Install Globus
添加一个globus用户,用来启动容器
[root@xx1 local]# adduser globus -p myglobus
在/usr/local下面建立globus文件
[root@xx1 local]# mkdir globus
更改属主
[root@xx1 local]# chown globus.globus globus
把网格的安装源文件拷贝过来,到globus文件夹下
[root@xx1 local]# cp /mnt/win/ gt4.0.8-all-source-installer.tar.gz ./globus
修改属主
[root@xx1 local]# cd globus/
[root@xx1 globus]# chown globus.globus gt4.0.8-all-source-installer.tar.gz
切换为globus用户
[root@xx1 globus]# su - globus
进入globus目录
[globus@xx1 ~]$ cd /usr/local/globus/
解压
[globus@xx1 globus]$ tar -zxvf gt4.0.8-all-source-installer.tar.gz
已经成功解压了
[globus@xx1 globus]$ ls
gt4.0.8-all-source-installer   gt4.0.8-all-source-installer.tar.gz
进入安装程序
[globus@xx1 globus]$ cd gt4.0.8-all-source-installer
Configure一下[想要特殊配置看帮助或者文档]
[globus@xx1 gt4.0.8-all-source-installer]$ ./configure –prefix=/usr/local/globus/
checking for javac… /usr/local/jdk/bin/javac
checking for ant… /usr/local/ant/bin/ant
configure: creating ./config.status
config.status: creating Makefile
开始make
[globus@xx1 gt4.0.8-all-source-installer]$ make
cd gpt && OBJECT_MODE=32 ./build_gpt
build_gpt ====> installing GPT into /usr/local/globus/
…………….
…………….
echo “Your build completed successfully. Please run make install.”
Your build completed successfully. Please run make install.
(make时经常出错,原因是系统缺少各种包,装个yum源,具体安装什么包应根据自己的系统而进行选择,大概有openssl、openssh、grid-packaging-tools-3.2-22.fc14.noarch.rpm、g++ glibc-static perl-ExtUtils-*等等。rm /usr/bin/env; cp /bin/env /usr/bin/env )
安装一下
[globus@xx1 gt4.0.8-all-source-installer]$ make install
ln -sf /usr/local/globus//etc/gpt/packages /usr/local/globus//etc/globus_packages
/usr/local/globus//sbin/gpt-postinstall
…………….
…………….
find-fork-tools: WARNING: “Cannot locate mpiexec”
find-fork-tools: WARNING: “Cannot locate mpirun”
checking for mpiexec… no
checking for mpirun… no
find-fork-tools: creating ./config.status
config.status: creating fork.pm
..Done
3 配置主节点
我们是实验环境,所以用SimpleCA来进行加密认证。在这里,我采用了本机+虚拟机的安装方式,把本机作为主节点,虚拟机作为子节点。
本机[xx1.com]:
ip:192.168.1.107
mask:255.255.255.0
gateway:192.168.1.1
虚拟机[xx2.com]:
ip:192.168.1.207
mask:255.255.255.0
gateway:192.168.1.1
把/etc/hosts文件修改如下:
[root@xx1 globus]# more /etc/hosts
127.0.0.1 localhost.localdomain localhost
192.168.1.107 xx1.com xx1
192.168.1.207 xx2.com xx2
然后,我在查看主机名称是不是正确
[root@xx1 globus]# more /etc/sysconfig/network
NETWORKING=yes
NETWORKING_IPV6=yes
HOSTNAME=xx1.com
修改主机名称之后,我们可以安装SimpleCA了
3.1 安装SimpleCA
切换到如下目录
[globus@xx1 globus]$ pwd
/usr/local/globus-4.0.1/setup/globus
[globus@xx1 globus]$ sudo ./setup-simple-ca
C e r t i f i c a t e A u t h o r i t y S e t u p
This script will setup a Certificate Authority for signing Globus
users certificates. It will also generate a simple CA package
that can be distributed to the users of the CA.
The CA information about the certificates it distributes will
be kept in:
/home/globus/.globus/simpleCA/
The unique subject name for this CA is:
cn=Globus Simple CA, ou=simpleCA-xx1.com, ou=GlobusTest, o=Grid
Do you want to keep this as the CA subject (y/n) [y]:
可以看到,本机作为主节点,ou=simpleCA-xx1.com,这就对应了上边让大家修改主机名称的作用。
直接回车键即可,然后又提示让电邮,这里可以随便填写,这是让别人向你索取证书的地址。
Enter the email of the CA (this is the email where certificate
requests will be sent to be signed by the CA):
接着,就是证书过期日期,默认五年,直接回车:
The CA certificate has an expiration date. Keep in mind that
once the CA certificate has expired, all the certificates
signed by that CA become invalid. A CA should regenerate
the CA certificate and start re-issuing ca-setup packages
before the actual CA certificate expires. This can be done
by re-running this setup script. Enter the number of DAYS
the CA certificate should last before it expires.
[default: 5 years (1825 days)]:
又提示给打开证书提供一个密码,并且确认
Enter PEM pass phrase:
Verifying - Enter PEM pass phrase:
接着,又是一堆输出,我们可以看到公钥和私玥放在什么地方了,还有分发包放在那里[分发包可以用来配置自节点]:
The private key of the CA is stored in /home/globus/.globus/simpleCA//private/cakey.pem
The public CA certificate is stored in /home/globus/.globus/simpleCA//cacert.pem
The distribution package built for this CA is stored in
/home/globus/.globus/simpleCA//globus_simple_ca_b62cb8c1_setup-0.19.tar.gz
This file must be distributed to any host wishing to request
certificates from this CA.
CA setup complete.
The following commands will now be run to setup the security
configuration files for this CA:
$GLOBUS_LOCATION/sbin/gpt-build /home/globus/.globus/simpleCA//globus_simple_ca_b62cb8c1_setup-0.19.tar.gz
$GLOBUS_LOCATION/sbin/gpt-postinstall
最后,终于完成了,SimpleCA生成了,但是我们也得到提示,还有一步:
Note: To complete setup of the GSI software you need to run the
following script as root to configure your security configuration
directory:
/usr/local/globus//setup/globus_simple_ca_b62cb8c1_setup/setup-gsi
For further information on using the setup-gsi script, use the -help
option. The -default option sets this security configuration to be
the default, and -nonroot can be used on systems where root access is
not available.
setup-ssl-utils: Complete
我们查看一下,是不是真的生成了分发包:
[globus@xx1 globus]$ sudo ls ~/.globus/simpleCA/
cacert.pem crl grid-ca-ssl.conf newcerts serial
certs globus_simple_ca_b62cb8c1_setup-0.19.tar.gz index.txt private
接下来,我们要让我们的本机[xx1.com],信任我们的globus的证书,那么我们要切换到root
[globus@xx1 globus]$ su - root
口令:
执行最后一步命令
[root@xx1 ~]# /usr/local/globus/setup/globus_simple_ca_b62cb8c1_setup/setup-gsi -default
setup-gsi: Configuring GSI security
Making /etc/grid-security…
mkdir /etc/grid-security
Making trusted certs directory: /etc/grid-security/certificates/
mkdir /etc/grid-security/certificates/
Installing /etc/grid-security/certificates//grid-security.conf.b62cb8c1…
Running grid-security-config…
Installing Globus CA certificate into trusted CA certificate directory…
Installing Globus CA signing policy into trusted CA certificate directory…
setup-gsi: Complete
(这步出现错误:
ERROR: Setup package not found. Looking for:
name=globus_simple_ca_11ad4bb3_setup,setup_name=, and setup version=
就是因为环境变量没有设置好,把/etc/profile中的环境变量设置好就行了)
根据上面的输出,我们看看相应的目录下面是不是多了什么。
[root@xx1 ~]# ls /etc/grid-security/certificates/
b62cb8c1.0 globus-host-ssl.conf.b62cb8c1 grid-security.conf.b62cb8c1
b62cb8c1.signing_policy globus-user-ssl.conf.b62cb8c1
[root@xx1 ~]# ls /etc/grid-security/
certificates globus-host-ssl.conf globus-user-ssl.conf grid-security.conf
这些都是SimpleCA的配置文件,它们的具体总用,可以参考相应的文档。
3.2 让本机请求证书并得到SimpleCA的认证。
[root@xx1 bin]# ./grid-cert-request -host xx1.comGenerating a 1024
bit RSA private key
.++++++
……………………..++++++
writing new private
key to ‘/etc/grid-security/hostkey.pem’
You are about to be
asked to enter information that will be incorporated
into your
certificate request.
What you are about
to enter is what is called a Distinguished Name or a DN.
There are quite a
few fields but you can leave some blank
For some fields
there will be a default value,
If you enter ‘.’,
the field will be left blank.
Level 0 Organization
[Grid]:Level 0 Organizational Unit [GlobusTest]:Level 1 Organizational Unit
[simpleCA-xx1.com]:Name (e.g., John M. Smith) []:
A private host key
and a certificate request has been generated
with the subject:
/O=Grid/OU=GlobusTest/OU=simpleCA-xx1.com/CN=host/xx1.com
The private key is
stored in /etc/grid-security/hostkey.pem
The request is
stored in /etc/grid-security/hostcert_request.pem
Please e-mail the
request to the Globus Simple CA cy_xiaoxiao@yahoo.com.cn
You may use a
command similar to the following:
cat /etc/grid-security/hostcert_request.pem |
mail cy_xiaoxiao@yahoo.com.cn
Only use the above
if this machine can send AND receive e-mail. if not, please
mail using some
other method.
Your certificate
will be mailed to you within two working days.
If you receive no
response, contact Globus Simple CA at cy_xiaoxiao@yahoo.com.cn
[root@xx1
grid-security]# pwd
/etc/grid-security
运行完成后会产生以下几个文件:
/etc/grid-security/hostkey.pem
/etc/grid-security/hostcert_request.pem
/etc/grid-security/hostcert.pem
(空文件)
下一步,我们要做的,就是转换为SimpleCA的角色,签署一下我们本机的认证请求。
我们首先拷贝请求文件到/usr/local/globus/bin下
[root@xx1 ~]# cp
/etc/grid-security/hostcert_request.pem /usr/local/globus/bin/
转换到globus下,因为我们本机是用globus用户产生的SimpleCA
[root@xx1 ~]# su -
globus
[globus@xx1 ~]$ cd
/usr/local/globus/bin
签署证书
[globus@xx1 bin]$
./grid-ca-sign -in hostcert_request.pem -out hostcert.pem
To sign the request
please enter the password
for the CA key:
The new signed
certificate is at: /home/globus/.globus/simpleCA//newcerts/01.pem
把签署过的证书复制回去,覆盖原来的空文件
[globus@xx1 bin]$ su
- root
口令:
[root@xx1 ~]# cp
/usr/local/globus/bin/hostcert.pem /etc/grid-security/
cp:是否覆盖“/etc/grid-security/hostcert.pem”?
yes
这三个文件属主都是root,但是我们的gridftp要用到它们,并且我们要采用globus用户启动web容器,所以我们就得有
两套认证的证书,一套归root使用,另一套归globus
[root@xx1
grid-security]# cp hostcert.pem containercert.pem
[root@xx1
grid-security]# cp hostkey.pem containerkey.pem
[root@xx1 grid-security]#
chown globus.globus container*.pem

